Spring BootとDoma2を連携してOracle接続する方法
Spring BootとDoma2を連携してOracle接続する方法です。

Doma とは、S2Daoのスタイル(DAOパターンや2 Way SQL)を踏襲したO/Rマッパーです。Seaser2 との依存関係はありません。Doma には、バージョン1と2がありますが、ここではバージョン2で検証していきます。
そもそものきっかけは、Java と SQL を分離したいと思ったことです。実務の中ではどうしても複雑な SQL を書かなければならないケースがあります。Java の中にゴリゴリ SQL を書く JPA はちょっと違和感があり、SQL ファイルが外出しできるプロダクトがないかなーと探していました。元々、S2JDBC を好んで使っていたこともあり、2 way SQL が Spring Boot で実現できないものかと模索していた感じです。調査を進めていくと Doma ってのがいい感じと情報を得たので試してみようと思います。
Spring Boot で 2 Way SQL をやりたい って方のお役に立てるとうれしいです。
Sponsored Links
目次
環境
今回のサンプルを作成した際の環境です。
- Spring Boot 1.4.1
- Thymeleaf 3.0.2
- Windows7
- Java8
- Eclipse 4.6 Neon
- Oracle 11g
- Doma2
こちらのページを参考にサンプルアプリを作ってください。既にSpring Bootアプリがある場合は、読み飛ばして結構です。
EclipseでDoma Toolsをインストール
Doma Tools は、Doma を使った開発をサーポートする Eclipse プラグインです。Dao のメソッドから対応する SQL ファイルへのジャンプしたり、逆もしかりと、開発がサクサクできますのでインストールしておきましょう。
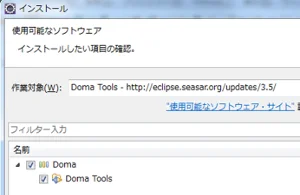
Eclipse メニューの[ヘルプ]-[新規ソフトウェアのインストール]を選択し、作業対象に「http://eclipse.seasar.org/updates/3.5/」を入力して追加ボタンを押下します。
Doma を選択してインストールして Eclipse を再起動します。

Sponsored Links
pom.xmlを編集
pom.xmlに下記を追加します。
<dependency>
  <groupId>org.seasar.doma.boot</groupId>
  <artifactId>doma-spring-boot-starter</artifactId>
  <version>1.1.0</version>
</dependency>

<repository>
  <id>sonatype-snapshots</id>
  <name>Sonatype Snapshots</name>
  <url>https://oss.sonatype.org/content/repositories/snapshots</url>
  <snapshots>
    <enabled>true</enabled>
  </snapshots>
</repository>
application.ymlを編集
src/main/resources/config 配下の application.yml に Doma の設定を追記します。
doma:
  dialect: oracle
  sql-file-repository: no_cache
全体の application.yml はこうなります。(application.propertiesでも可)
spring:
  datasource:
    url: jdbc:oracle:thin:@dbserver:1521:oracle
    username: scott
    password: tiger
    driverClassName: oracle.jdbc.driver.OracleDriver
doma:
  dialect: oracle
  sql-file-repository: no_cache
Sponsored Links
テーブルを作る
サンプルのテーブルを作ります。
CREATE TABLE RESERVATION
(
  ID      NVARCHAR2(10) NOT NULL,
  NAME    NVARCHAR2(255) NOT NULL,
  CONSTRAINT PK_RESERVATION PRIMARY KEY (ID) USING INDEX
);
ついでにデータも入れておきましょう。
insert into RESERVATION values ('1', 'hoge');
insert into RESERVATION values ('2', 'piyo');
insert into RESERVATION values ('3', 'fuga');
insert into RESERVATION values ('4', 'foo');
insert into RESERVATION values ('5', 'bar');
insert into RESERVATION values ('6', 'baz');
Entityを作る
Entity クラスを作ります。@Entiry アノテーションは org.seasar.doma.Entity を使います。複数あるので間違えないように注意しましょう。public に宣言できますので setter / getter は不要です。これはいい^^
package springbootapp.domain.model;

import org.seasar.doma.Entity;
import org.seasar.doma.Id;
import org.seasar.doma.Table;

@Entity
@Table(name="reservation")
public class Reservation {
  @Id
  public String id;
  public String name;
}
Sponsored Links
DAO interfaceを作る
DAO interface クラスを作ります。ここに search メソッドと insert メソッドを作ります。アノテーションは @ConfigAutowireable と @Dao を付加します。@ConfigAutowireable は、@Repository と @Autowired の両方を加味しているみたいですね。
package springbootapp.domain.repository;

import java.util.List;

import org.seasar.doma.Dao;
import org.seasar.doma.Insert;
import org.seasar.doma.Select;
import org.seasar.doma.boot.ConfigAutowireable;
import org.springframework.transaction.annotation.Transactional;

import springbootapp.domain.model.Reservation;

@Dao
@ConfigAutowireable
public interface ReservationRepository {
  @Select
  List<Reservation> selectAll();
  @Insert
  @Transactional
  int insert(Reservation reservation);
}
@Transactional は、メソッドの開始がトランザクションの開始、メソッドの終了がトランザクションの終了になります。
こちらのサイトに詳しく書かれていたので、参考にさせていただきました。ありがとうございます^^
・@Transactional(Spring Framework)のpropagation属性 - Java EE 事始め!
Serviceを作る
ドメイン層の Service クラスを作ります。ReservationRepository の selectAll メソッドを呼び出します。
package springbootapp.domain.service;

import java.util.List;

import org.springframework.beans.factory.annotation.Autowired;
import org.springframework.stereotype.Service;
import org.springframework.transaction.annotation.Transactional;

import springbootapp.domain.model.Reservation;
import springbootapp.domain.repository.ReservationRepository;

@Service
@Transactional
public class ReservationService {

  @Autowired
  ReservationRepository reservationRepository;

  public List<Reservation> getReservation() {
      return reservationRepository.selectAll();
  }

  public int insert(String id, String name) {
    Reservation reservation = new Reservation();
    reservation.id = id;
    reservation.name = name;
    return reservationRepository.insert(reservation);
  }
}
Controller クラスを変更する
コントローラークラスに下記を追記します。Select と Insert の確認を同時にやっちゃいます。
System.out.println("[START] Doma2を使ってORALCEに接続します。");
List<Reservation> reservations = reservationService.getReservation();
for (Reservation reservation : reservations) {
  System.out.println(" " + reservation.id + " : " + reservation.name );
}
reservationService.insert("10", "saka");
System.out.println("[END  ] Doma2を使ってORALCEに接続しました。");
id 固定なので、一回しか Insert できないけど・・、まぁ、動作検証するだけなので、ご愛嬌ということで^^;
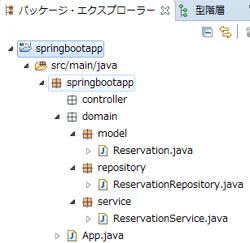
パッケージ構成の確認
ここまでの構成はこんな感じになっています。

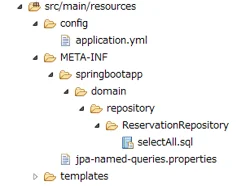
META-INF 以下は、こんな感じ。

実はこのパッケージ構成にする前は、下記のエラーが出て動作しませんでした。
Description:
Field reservationRepository in springbootapp.ReservationService required a bean of type 'springbootapp.ReservationRepository' that could not be found.

Action:
Consider defining a bean of type 'springbootapp.ReservationRepository' in your configuration.
こちらのページを参考にして、パッケージ構成を見直してビルドしたところ、動作できました。ありがとうございます^^
動作確認
早速、ビルドして動作確認してみましょう。
http://localhost:8080/ へアクセスすると・・・
[START] Doma2を使ってORALCEに接続します。
2016-11-25 15:31:57.912  INFO 10032 --- [nio-8080-exec-1] o.s.doma.jdbc.UtilLoggingJdbcLogger      : [DOMA2220] ENTER  : クラス=[springbootapp.domain.repository.ReservationRepositoryImpl], メソッド=[selectAll]
2016-11-25 15:31:57.979  INFO 10032 --- [nio-8080-exec-1] o.s.doma.jdbc.UtilLoggingJdbcLogger      : [DOMA2076] SQLログ : SQLファイル=[META-INF/springbootapp/domain/repository/ReservationRepository/selectAll.sql],
select
 id
,name
from reservation
order by name
2016-11-25 15:31:58.027  INFO 10032 --- [nio-8080-exec-1] o.s.doma.jdbc.UtilLoggingJdbcLogger      : [DOMA2221] EXIT   : クラス=[springbootapp.domain.repository.ReservationRepositoryImpl], メソッド=[selectAll]
 5 : bar
 6 : baz
 4 : foo
 3 : fuga
 1 : hoge
 2 : piyo
2016-11-25 15:31:58.045  INFO 10032 --- [nio-8080-exec-1] o.s.doma.jdbc.UtilLoggingJdbcLogger      : [DOMA2220] ENTER  : クラス=[springbootapp.domain.repository.ReservationRepositoryImpl], メソッド=[insert]
2016-11-25 15:31:58.089  INFO 10032 --- [nio-8080-exec-1] o.s.doma.jdbc.UtilLoggingJdbcLogger      : [DOMA2076] SQLログ : SQLファイル=[null],
insert into reservation (id, name) values ('10', 'saka')
2016-11-25 15:31:58.103  INFO 10032 --- [nio-8080-exec-1] o.s.doma.jdbc.UtilLoggingJdbcLogger      : [DOMA2221] EXIT   : クラス=[springbootapp.domain.repository.ReservationRepositoryImpl], メソッド=[insert]
[END  ] Doma2を使ってORALCEに接続しました。
おおお、Select も Insert もできちゃいましたー^^
参考サイト
今回のサンプルは、ほぼこちらのサイトのまんまですね。
まとめ
Spring BootとDoma2を連携してOracle接続する方法を紹介しました。
Doma2 いい感じですねー。SQL を書くことに慣れている私としては、とてもいい感じです。やはりファイルに SQL 書くと、手抜きしないできちんと書きますからねー。書きながらパフォーマンスチェックもできたりするんで。
ちなみに Doma-Gen を使うと、エンティティクラスや Dao インターフェースクラスを自動生成してくれます。s2jdbc-gen と似たような感じでとてもよさげです^^
こちらのサイトでは Spring Boot + Doma2 について、とても詳しく書かれています。実務でも使えるレベルと思いますので、参考にしてみたいと思います。ありがとうございます^^
・Spring Boot で Doma 2 を使用するには - かんがるーさんの日記
皆さんも試してみてください。
次回はフロントエンド周りでも検証してみようかなー。
おつかれさまでした。
Sponsored Links